Okay so last weekend I was staring at my sagging tennis net like, “Man, this won’t do.” Balls were rolling right under the middle! Gotta tighten this thing properly. I remembered the crank handle that came with the net posts but honestly, I’d never actually installed it myself. Looked simple enough online, right? So I grabbed the dusty box from the garage and just went for it.

Getting Started & Finding the Crank Point
First thing: Figure out where this crank actually attaches. I knew it went on the bottom of the net post, but which one? Duh! Looked at the posts. One had a metal loop thing stuck onto it already – the pulley the cable goes through. The other post? Totally flat bottom. That had to be it – the crank side. Checked the instructions (well, glanced at the blurry diagram on the box) and yep, that was the spot.
Gathering the Tools (Mostly Just My Hands)
Opened up the crank box. Inside was the crank handle itself, this metal T-bar thing, a couple of bolts, and a washer. Didn’t need a fancy toolkit. My hands would probably do it. Gotta put on some grip gloves though, handling metal pins sucks.
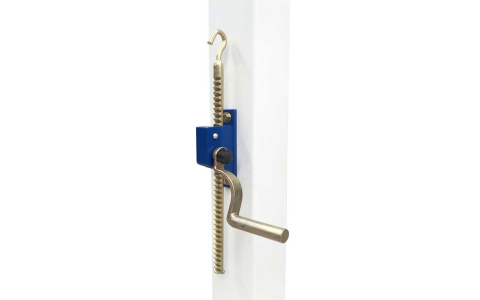
The Slightly Annoying Fitting Part
Here’s where it got a bit fiddly. The crank has this square hole at the end. It’s supposed to slide onto a square metal pin sticking out from the bottom of the net post. Cool. Got the crank roughly aligned. Started pushing it on. Wouldn’t go! Took me a minute to realize it wasn’t quite lined up straight. Had to wiggle it just a bit, angle it slightly. Finally felt it slip over the pin with a satisfying metal clunk. Okay, progress!
Locking It Down (Almost Forgot!)
Slid the crank on, felt good. Started to walk away, then remembered: “Oh yeah, probably shouldn’t trust gravity here.” There was a little locking pin included. Had to slide this skinny metal pin through a small hole in the crank housing and through a matching hole in the main pin underneath. Easy enough. Tapped it in with my palm until it was flush. That thing isn’t going anywhere now!
The Fun Part: Cranking!
Alright, moment of truth. Grabbed the T-handle. Pushed it up. Felt resistance. Pushed it further… click, click, click! Oh yeah, that sweet sound! The cable started winding in. Saw the net immediately begin to rise off the ground in the middle. Kept cranking it step-by-step until the net looked taut and straight. Way better than just pulling the cable by hand! Took maybe 10 good cranks? Wasn’t counting, just went until it felt right.
Done? Basically! Checking It Out
Gave the net a decent flick with my finger. Nice tight bounce back. Knelt down to see the net clearance – just right, a couple inches above the court surface. Stood back and admired my work. It literally took longer to dig the box out of the garage than to actually install the crank. From opening the box to a tight net was maybe, what, 10 minutes? Tops? And most of that was figuring out that initial alignment wiggle.
Definitely a “why didn’t I do this sooner” moment. Super easy, zero tools needed besides my hands and a bit of patience wiggling it on. Now the net actually looks like it means business!